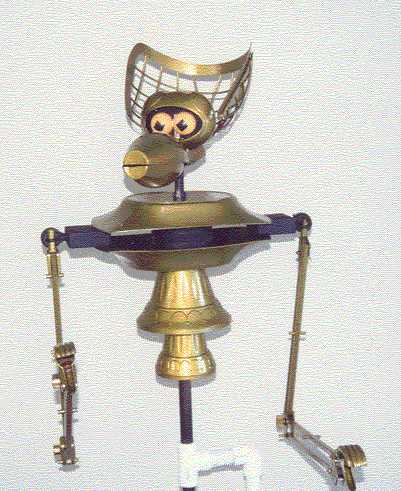
No one on earth has a Crow T Robot like mine. No one. Guaranteed. Although my dad suggested I remind everone he IS "factory made." BTW - before I go on, a HUGE THANK YOU to my dad for donating his time and his shop for the cause. I don't know if I would have even tried to make the bots if I hadn't had his help. I won't go exactly into how to make Crow (or Servo) in these pages. There are several other sites you can visit that will probably give much better instructions than I could. However, for those who can't find or afford all the "correct" (i.e. boring) pieces, maybe I can inspire you to keep looking where you might not have expected. Let's start with the top down, shall we? The Mask/Net I decided not to spring for the $40+ Cooper FX&-d/lu-tyy77465 whatever. Alternative: the Cooper SK600 on sale at a used sporting goods store for $5. Add a little piping around the edges and violin! Other alternatives for the trim might include cardboard, poster board, tin foil, etc. The Skull/eye sockets You could wait months before seeing a Schwartz soap dish for sale on Ebay. One alternative is a casting or vac-u-formed replica available at several different websites. The replicas are pretty fairly priced, but if you are looking to go rock bottom cheap, and don't mind the substitution, a VIEW MASTER just might work surprisingly well. It even comes with its own notch for the pin. Cost: $6 at Toys R Us.  |  | Eyes and Mouth | Ping pong balls are relatively cheap. The pins show up occasionally on e-bay, or you can get them for a decent price at some of the other bot building sites. This one I found at a flea market. Cost: <$1 | Body | The Floraliers I got off of ebay. Umm.... about $4 each plus shipping. One hint - search for "floraliers," not just MST stuff or Bot parts. You might be able to save a buck or two. | Shoulders/Arms | Welcome to 80-90% of all the shop work we did for Crow. The shoulder joints were a massive effort. Why, you ask? Well, partially because I went cheap on the arms. The "wallace" lamp type of arm has a different kind of socket joint, than most other similar looking desk lamps (that I found at the flea market for $4 each) don't. This tiny little box attached to the Floralier took us 3 seperate weekends to replicate. We gotchyer ratchet wrench handles, we gotchyer eyescrews, we gotchyer wooden blocks, milled, and drill pressed custom connectors. Now the upside is, I don't think there is a movement that the original arms could make that mine cannot. By loosening and retightening the eyescrews, and twisting the wrenches, Crow's arms can be posed in more positions than my own. Out, back, up, ... well you know what your arms can do. The downside, of course, is the high amount of custom work that needs to be done for this. Being an engineer and son of same, we had fun finding out how to make it work, but ... um... we won't be making any more for friends or fans. If you want good shoulder joints, you are probably going to have to do it the traditional way: Buy the replicas. | Milk (and steel) for strong bones | One hint I will give - an additional shoulder support is recomended, no matter how you put the shoulders together. (Nobody else seems to agree with me on this, though. Oh well.) The floralier is not the sturdiest plastic in the world, and the shoulders are connected right at the very edge. To avoid the arms falling out of their sockets from their own weight, we added a metal bar accross the top of the upper floralier (inside). This might not be necessary if your bot is mostly for show. But I have the feeling mine will see a lot of action, and travel in a lot of back seats. And a short bent hunk of steel was a quick and sure way of keeping Crow standing straight and proud. | | | 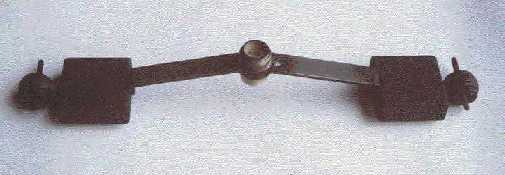 | Hands (across the water) | The last parts I found. And by "found" I mean "bought off the web." Two original gripper toys. $10 plus shipping for the pair. Thanks Bob! | Primer is as Primer does. | A note about painting that I didn't read about online until AFTER I did it wrong, and then everyone helped out by saying "Oh no. You should have done it 'this' way...." Somewhere between (or instead of) the black primer coat and the expensive Testors Gold coat, you will want an intermediate coat of paint. Probably a regular gold. Because Testors onto black is going to take a LONG time. It's not so bad on the flat parts, but the Floralier cones and the bowling pin especially will take a huge amount of paint to acheive the right color. And Testors comes in little cans that cost a lot. Just a thought. And people- CLEAN the plastic thoroughly and lightly sand BEFORE adding any paint. You don't want to waste an entire extra day redoing an entire side because as a matter of fact, the paint won't cover up the left-over adhesive from a price tag.... | Ground control | No hangy-down strings for me! Nosireebob. Check this out. Head, mouth and eye controls custom inlaid directly into a 3 tiered pipe system. Classy, yes? 
And a support pipe goes right into his own custom stand. Wheels courtesy of a broken office chair. | | | Crow, for my first robot, can I just say: You are looking FINE!  | |